Introduction
|
Lesson 1 of 7
Congratulations on your decision to play the musical saw! Even though you can play music on just about any saw, life will be a whole lot easier if you use a saw fabricated specifically for music (please see our store). You’ll get about a 2 octave range vs. 1 octave. And the sustain and playability of a Musical Saw is magnitudes greater than a carpenter’s saw. Playing the saw is very easy – there are only two things to do:
Make the saw vibrate to produce the sound (you can do this by either using a bow or a mallet)
Change from note to note (you do this by either tightening or loosening the bend in the saw.)
Most people find it easier to start out playing with a mallet and then graduating to a bow – so that’s the approach we’ll take. |
Holding the Saw
|
Lesson 2 of 7
 Goal: Teach you how to hold the saw. Goal: Teach you how to hold the saw.
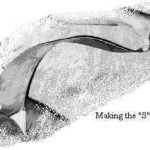
Sit down on a dining room chair with your knees about 3 inches (8 cm.) apart. Place the saw handle between your knees with the saw tip pointing up and the teeth facing you. DO NOT press your knees tightly together or your legs will get very tired. This next step is crucial: To play a note, the saw must be curved in an “S” curve. Refer to the drawing on how to make that curve. Use your *left thumb about 4 inches (10 cm.) from the tip and push the saw down and to your left. The saw will be at a 45 angle to your left. (Actually it will really be curved since you have it clamped loosely between your knees.) To make the second curve of the “S”, with your left hand, hook your 4 fingers under the tip and pull up (while your thumb is bearing down). You now have the “S” curve. If you ever lose this “S” curve while you are playing, your saw will fall silent. In the picture, the “S” curve is greatly exaggerated. The small curve made by the thumb and fingers only needs to be a gentle curve.
Practice: Experiment changing the tightness of the bend in the saw by moving your left hand up and down… all the while maintaining the “S” curve. The reason you are practicing these movements is because these are the motions you will make when you start playing the saw – You will tighten and loosen the curve in order to change from note to note. But for now, we just want you to concentrate on preserving the “S” curve while bending the saw different amounts. |
Finding the Sweet Spot
|
Lesson 3 of 7
Goal: Teach you what the sweet spot is and how to find it on your saw.
For this exercise, you will need something to act as a mallet – (a wooden spoon, steak knife, screwdriver, etc.) Hold the saw as discussed above and pick up your “mallet” with your right hand. We don’t want metal striking metal – so flip your mallet around so that you strike the saw with the knife handle and not the knife blade. While holding the saw in an “S” curve, start rapping the top of the saw blade with your “mallet”. Start about 4 inches (10 cm.) from the saw handle and bit by bit, creep up towards the tip. Listen closely to the tone the rapping makes. It dies out fairly quickly doesn’t it? As you move up the saw blade, you will find a spot that when you rap it – the tone sustains for quite a few seconds. You’ve found the sweet spot! Let’s try it again, only this time bend the saw a different amount and try rapping it to find the sweet spot. When you find the sweet spot, compare its location with the previous sweet spot – Notice how when you bend the saw different amounts, the sweet spot moves. The sweet spot moves toward the tip as you bend the saw tighter and back down to the handle as you loosen it. OK, let’s try this. Start rapping the saw until you find the sweet spot. When you find it, give the saw a good solid rap and let the saw sing for a while. Now relax your left hand so that you lose the “S” curve. Notice how the saw stops singing? That’s how crucial the “S” curve is. One final experiment. Again start rapping the saw at a sweet spot. When you find it, give a good rap and bend the saw either tighter or looser and listen to the tone change.
Practice: Play around with rapping the saw with your “mallet” to find the Sweet Spot for different bends. To make this exercise more pleasant, you can even try rapping and bending out a tune. |
Holding the Bow
|
Lesson 4 of 7
 Goal: teach you how to take care of and hold the bow. Goal: teach you how to take care of and hold the bow.
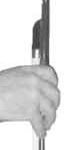
We don’t need the saw for this lesson, so you can put it away for the time being. Up until now, you have been making the saw vibrate by rapping it with a mallet. We are now going to let the bow take the place of the mallet to make the saw vibrate – The music is much prettier when you use a bow instead of a mallet. If your rosin is new, you have to prepare it before rosining your bow. Use your pen knife to scratch the surface of the rosin in a cross hatch pattern. Don’t cut very deep into the rosin, all you have to do is just scratch it. Your bow has two ends, the non-pointy end is called the frog. On the end of the frog, is a knob. Whenever you play, you must tighten this knob so that the hairs are taught without being too tight. As soon as you finish playing, unscrew the knob to relax the hair. Never touch the hair with your fingers – as the oil from your fingers could ruin the hair. To rosin your bow, tighten the knob and then hold the bow near the frog and sweep the bow up and down the rosin. If this is a new bow, you may have to do this 300-400+ times. Thereafter, you may only need to take about 50 strokes every time you play. To hold the bow for saw playing, hold it in your right hand by pinching the wooden stick between your thumb and fingers just as if you were holding the stem of a champagne glass. The pointy end pointing down and the hair facing you. Your thumb will be between the stick and the hair.
Practice: No practice for this lesson but remember to always loosen the knob before putting your bow away. |
Bowing the Saw
|
Lesson 5 of 7
Goal: teach you how to bow the saw and where to bow for each note.
Now we will need both the saw and the bow. We won’t need your “Mallet” again, so you can return it to the kitchen drawer. Hold the saw as we taught you in the first lesson. Make sure you maintain the “S” curve. Hold the bow in your right hand and try to maintain the bow perpendicular to the saw edge at all times. Just as there are sweet spots on the top (flat) of the saw, there are equivalent sweet spots on the edge of the saw; and those are the sweet spots you will have to find with your bow. When you bow, you won’t be bowing the top of the saw, rather, you will be bowing the edge (opposite of the teeth). Try to position the bow on a sweet spot. With moderate pressure, draw the bow across the edge of the saw (you can either bow up or down). If you don’t get a note, you probably are not on the sweet spot. try moving the bow a little towards the tip or handle and bowing again. Alternatively, you could just change the tightness of the bend of the saw. Pause frequently to rosin your bow. When you do bow on the sweet spot, you will hear a beautiful tone. As soon as the saw sings, pull the bow away from the saw, otherwise, you will deaden the note.
Practice: Try bending the saw different amounts and then locate the sweet spot with your bow. Try bowing with ‘up bow’ strokes only, ‘down bow’ strokes only, or a mix of both up and down strokes – determine which bowing technique works best for you. Pull the bow away from the saw as soon as you play a note. Try bending the saw after bowing it to change pitch. |
Changing Notes
|
Lesson 6 of 7
Goal: Teach you to change notes.
This is the last lesson before you actually play songs – so hang in there. You’ve already practiced pulling the bow away from the saw as soon as you play a note. Now when you pull the bow away from the saw, try bending the saw to play several pitches before the volume dies out – As the volume dies down, move the bow to the current sweet spot and give it another stroke. Experiment with playing as many notes as you can between bowings.
Practice: Scales. To get started, have someone play scales on another instrument and play along with him/her – then try solo. Practice your scales every day! |
Playing a Song
|
Lesson 7 of 7
Goal: Have you start playing beautiful saw music.
You’ve done all the hard work – all that’s left is to start playing music! So pick up your saw and start playing. You will find it as easy as whistling. Try to play the first few songs by yourself (not to a CD/radio). After a while, you can start “jamming” to a CD. You will find you have to rosin your bow quite frequently – maybe every song.
- maintaining the “S” curve
- keeping the bow perpendicular
- bowing as lightly as possible
Practice: each practice session with a set of scales before starting in on the “fun” stuff. |
Advanced topics
|
Here’s a listing of things to watch out for when you’re playing the saw:
- One common mistake is to bow too lightly – make sure when you bow you maintain medium pressure. We don’t want you to push down too hard with the bow as that will cause significant wear on the bow hair. But, if you push down very lightly, you’ll have a hard time playing. – Experiment with varying amounts of bow pressure.
- Another error is changing the bend of the saw whilst bowing. This may work out for you when you become a bit more experienced. But when starting out, keep the saw stationary until you finish each bow stroke.
- vibrato – To get a more pleasing sound, bounce one of your legs (usually your right leg – if you bow with your right hand) – this is sometimes called “nervous knee”. When you first start out, just keep your knee jiggling the entire time. Once you become an expert, the goal is to attack each note without vibrato and then build up the vibrato – but this is an advanced techique that you won’t have to worry about for several months.
- Cheating while bowing – Instead of drawing the bow perpendicular to the saw, you can sweep the bow towards the saw tip as you are drawing up on the bow – Using this technique, you are able to cover a broader swath of the saw while bowing – so you don’t need to know exactly where the sweet spot is at all times. – The problem with this is that you will have a lot more “bow noise” while playing. but it is a shortcut while you are learning to play.
- Using a cheat – A cheat is a small wooden handle that attaches to the tip of the saw. Not only does this handle allow you to bend the saw much more easily but it will also keep your left hand from tiring out.
|